Have you ever heard the saying, “Time is money”? Well, when it comes to the boot time of FreeBSD, every second counts. In this article, we will take a closer look at just how fast FreeBSD can boot and the factors that contribute to its efficiency. But it doesn’t stop there – we will also explore the world of MicroVMs and their impact on FreeBSD’s boot process. So, if you’re curious to know just how quickly FreeBSD can get up and running, you won’t want to miss what we have in store.
The Efficiency of MicroVMs
The efficiency of MicroVMs is evident in their ability to provide fast and resource-efficient virtualization solutions. One notable example of this efficiency is demonstrated by AWS Firecracker, a microVM engine used by AWS to power their Function as a Service (FaaS) offering, Lambda. FreeBSD, a popular operating system, has been successfully run on Firecracker, showcasing the significance of MicroVMs in optimizing boot speed. FreeBSD kernel developer Colin Percival achieved impressive results by replacing a sort algorithm in the FreeBSD kernel, resulting in a boot time reduction of 100 times, down to just 25 milliseconds.
However, there were optimization challenges in getting FreeBSD to boot on Firecracker. Certain initialization steps that assumed booting under Xen had to be removed. Additionally, querying ACPI for processor information failed as Firecracker does not provide ACPI support. The initialization of the emulated serial console also initially faced difficulties. Furthermore, memory usage became a concern due to Firecracker’s default allocation of 128MB RAM. Nevertheless, various optimizations contributed to small time savings in the boot process, improving overall efficiency.
Firecracker is not the only microVM engine available. QEMU, a well-known virtualization tool, has added a microvm virtual platform inspired by Firecracker. Other microVM engines are being developed, expanding the options and potential use cases for MicroVM technology. The significance of MicroVMs lies in their ability to provide fast and efficient virtualization solutions, making them ideal for serverless compute power and FaaS scenarios.
Boot Mechanisms for FreeBSD
To understand the boot mechanisms for FreeBSD, it is important to explore the different options available and how they impact the overall system startup process. Here are four key points to consider:
- BIOS boot limitations: BIOS, or legacy boot, is the traditional 16-bit system boot mechanism supported on most computers. While it still works well with FreeBSD, BIOS is slower than UEFI and lacks support for booting from NVMe devices. It also has limitations in terms of hardware compatibility and partitioning schemes.
- UEFI boot advantages: All modern amd64 systems provide UEFI boot, which offers several advantages over BIOS. UEFI supports faster boot times, improved hardware compatibility, and the ability to boot from NVMe devices. It is also required for ARM’s ServerReady certification.
- USB stick preparation: To create a bootable USB stick for FreeBSD, you need to use tools like fdisk, bsdlabel, newfs, and boot0cfg to prepare and format the stick. The choice of file system, such as UFS1 or UFS2, can impact copying speeds.
- MFS configuration: Memory File System (MFS) is used in the boot process to mount the USB stick. It involves modifying loader.conf, creating an empty MFS file, formatting and mounting the file, copying important files, and configuring the /etc/fstab. MFS allows for faster boot times by utilizing memory instead of disk storage.
The FreeBSD Boot Process
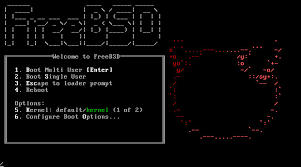
When booting a FreeBSD system, the process is divided into two sections: the road to the FreeBSD loader(8) and the Beastie Menu, and the booting of the selected FreeBSD kernel. The boot process depends on the system architecture, boot method, partition scheme, and filesystem. FreeBSD supports various booting modes and configurations.
To highlight the stages of the boot process, here is a table:
| Bootloader Stages | Initialization Steps | Kernel Loading |
|---|---|---|
| boot0 | Displays boot menu | N/A |
| boot1 | N/A | N/A |
| boot2 | N/A | N/A |
| loader | Loads and initializes | Loads the |
| the FreeBSD kernel | FreeBSD kernel | |
| init | N/A | Sets up |
| system | ||
| initialization |
During the bootloader stages, the boot0 program displays a boot menu based on partition types. The loader stage is responsible for loading and initializing the FreeBSD kernel. Finally, the init stage sets up system initialization.
Understanding the boot process is essential for troubleshooting and optimizing boot speed. By optimizing each stage and minimizing initialization steps, FreeBSD can achieve faster boot times.
Support and Development Services for FreeBSD
If you’re looking for support and development services for FreeBSD, you can rely on the expertise and resources provided by the FreeBSD team. Here are four reasons why FreeBSD’s support and development services are valuable:
- Service options: FreeBSD offers a range of service options to meet the needs of individual developers and organizations. Whether you need assistance with implementation, troubleshooting, or optimizing FreeBSD for specific use cases, there are service options available to support your requirements.
- Enhancing implementation: The FreeBSD team can help you enhance your FreeBSD implementation by providing guidance, best practices, and expertise. They can assist with optimizing performance, improving security, and ensuring compatibility with other systems or software.
- Future projects: If you have future projects in mind that involve FreeBSD, the FreeBSD team can help you plan and scope out the work. They can provide insights and recommendations based on their experience and knowledge of FreeBSD, helping you make informed decisions and set realistic goals.
- Individual and organizational support: Whether you’re an individual developer or part of an organization, FreeBSD offers support tailored to your specific needs. They can provide individual developers with technical assistance and guidance, while also offering organizational support for larger-scale projects or deployments.
With FreeBSD’s support and development services, you can leverage their expertise to enhance your FreeBSD implementation, plan for future projects, and receive the individual or organizational support you need.
Booting Freebsd With Bios/Legacy and UFS
When it comes to booting FreeBSD with BIOS/Legacy and UFS, there are specific steps and considerations to keep in mind. To prepare the USB stick, you can use fdisk to format it and bsdlabel to configure it. Then, use newfs to create a file system and boot0cfg to install the boot code. You have the option to choose between UFS1 and UFS2 file systems for different copying speeds.
After preparing the USB stick, you need to mount it. Use the mount command to mount the USB stick and copy all directories from FreeBSD to it. Modify the loader.conf file in the /usb/boot directory and create an MFS (Memory File System) in the /boot directory on the USB stick. Modify the /etc/fstab in MFS to mount the USB stick.
Next, modify the loader.conf on the USB stick by adding necessary lines and enabling MFS root. Load necessary modules for splash screen, vesa, and compression, as well as additional file system drivers. Set vfs.root.mountfrom to mount the root file system from MFS.
To create and test MFS, use the dd command to create an empty MFS file and format it. Mount the MFS file, copy important files from the FreeBSD system to it, and unmount and gzip the file. Optionally, you can chroot into the MFS file to test its functionality.